Why Wool?

Monday, September 25, 2017

Last night the snow came down here in Wyoming. Fortunately, it didn't stay around come morning. The snow, and the chill in the air got me thinking about wool, but, honestly, when am I not thinking about wool?
Why do people use wool for knitting? Why do people have such a negative idea of wool?
To begin this discussion, what is wool? Wool is the protein fiber that grows on sheep. It is shorn or shed from the animal and is then spun into yarn. That's the short of the whole process.
But why do so many people have a bad impression of wool? Maybe they shrank their favorite sweater, maybe it's itchy, maybe they've heard from so many people that it is itchy and they just believe it.
Not all wool is made the same. As we saw from my previous posts about the fiber samples, wool comes in many different colors, lengths, weights, etc.. The best thing to do is to go to a yarn shop and feel all the wool yarns they have; do the neck test. The neck test is when you take a skein or hank of yarn and put it on your neck. The feeling on your neck will tell you a lot. If you find it itchy, there are many reasons why. Wool yarn is made from, for the sake of understanding, the "hair" of the sheep. Fiber is measured in microns. The micron measurement is based on the average diameter of the fiber. Human hair, by comparison, ranges from .017 to .18 millimeters, according to Wikipedia. Wool fibers range any where from less than 21 microns to over 45 microns. The comparison of the two is that 1 micron is .001 of a millimeter. So, fiber diameter is one variable.
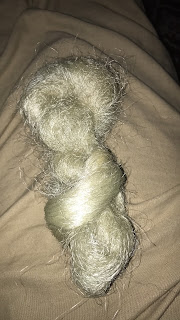
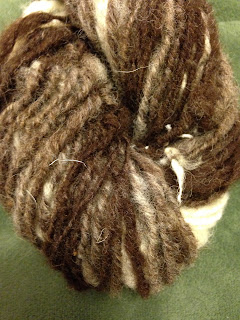
Now, you might ask, well what makes wool so variable? It's the same reason why human hair is so different. People from different parts of the world, or with different ethnic backgrounds have vastly different hair. If you look at your own body hair, (this is a lot easier on a hairy, Italian guy) depending on where it grows on the body can yield a very different hair. Pardon the slightly disgusting comparison, but, my sample of Black Welsh Mountain wool (left) was very comparable to pubic hair; that would not make a very comfortable garment. Yet, many of the wool samples I've spun have been like cotton candy. Now who wouldn't like a cotton candy sweater, except maybe a diabetic. Today there are so many new indie dyers and spinners making wonderful yarns from their local wool, you really should see and feel what they have to offer.


The next variable is how the wool was spun. The same sample of wool could be spun worsted and make a very fine thread, think of a fine wool suit, or it could be woolen spun and make a very lofty soft yarn. (left, woolen spun Finn, right worsted spun Finn)

If we look to the psychology behind wool we can see many other reasons why people don't like wool. I believe this to go back to our mothers, and or grandmothers. If we look back to the 1930's and 40's during war time, wool was an important fiber for military uniforms, so it was in scarce commodities to the regular person. What did they do? they recycled old wool. Recycled wool was wool that was taken from yarn, fabric, second cuts, etc., and combed out. This broke the fibers and made it very rough to the touch. Many garments were made from this fabric and some generations lost the feeling of pure new wool, which is where that label came. Pure New Wool, is wool that hasn't been used for anything but this garment. Today recycled wool is sometimes used for rugs and carpeting.

Why should you use wool for your next project? This is a big question. I think the first fear in using wool for a project is it's washing. Yes, wool felts. Wool felts from hot water and agitation. So wash in cool water and by hand. Or if you are lucky and have a fancy new washing machine, wash it on super delicate hand wash cycle. I have done this with cashmere sweaters and they did not felt at all. We also have to let go of the idea that if we wear a garment once it has to be washed. If you don't spill on your sweater you don't have to wash it. I generally only wash my sweaters a few times a year. You definitely want to wash them before going into storage to prevent moths. When drying your sweaters, lay them out on a towel, roll them up into it and squeeze. You'll be amazed how much water comes out. Why should I be worried about shrinking when I can use superwash, or shrink free wool? Some superwash wools are terrible. To make wool superwash there are many things that happen to it. Most of these treatments involve chemicals. Wool fibers are coated with a plastic like coating to prevent the scales on the fibers from locking, these scales are the reason why it felts. Other treatments involve pre-shrinking the wool before it is spun. Do yourself a favor and look it up yourself, you will be surprised how much goes into making shrink proof wool.
This brings up another reason why wool is so wonderful, it's wicking properties. Wool can absorb a lot of water. For example, early firefighters would have wool suits that they would soak in water prior to entering a burning building to prevent it from burning. Wool can also be semi water proof. In the past raw wool was spun in the grease to keep it from absorbing water, seeing as how we know that water and grease do not mix.
Wool can be expensive, but if you are spending upwards of 40 hours of work on a sweater, don't you want it to be the best damn thing you can make? Wool has forgiveness that man made fibers do not have. Blocking can make all the difference in the final project of a wool sweater. These results will most likely not happen in acrylic. Also use your head when thinking about your project. Don't use a luxury fiber, like cashmere, for an out door sweater. Use something that has good body and nice insulation.
I don't think anything is better than a wool sweater, especially one that is hand made with love. It is time you take pride in your knitting. Go out in public and knit and see how many people are fascinated by what you are doing. Take pride in the fact that you are making something with your hands. And never say "oh, I'm just knitting"; most people don't have those motor skills. So, be proud of your skills and their outcomes, and buy some wool for that next project. You can also be very supportive of your local economy by doing so. Most yarn shops have a local section that may include local wool. And last, but not least, do a sheep a favor and use it's wool, it'll have another fleece next year.

The Long Kozo Journey

Tuesday, September 5, 2017

So, I bet you've been asking where I have been. Well I am going to tell you now.
Long story short I hand spun, hand wove, and hand sewed a kimono.
This all started over a year ago. A group of artists were contacted to see if there was interest in doing a communal art show with a through line being kozo.
Now what is kozo? Kozo is a plant that grows in Japan. It is harvested yearly to make paper. The stalks are harvested and dried.


Once dried, the stalks are cooked in soda ash to break down the outer fibrous bark.


Once the stalk has turned the proper grey color, they are removed from the boiling water and cooled by rinsing clean.

The dark outer bark is then hand picked off the fiber and it is then beaten with a mallet into a pulp.


The pulp is then added to water and paper is made. It is at this point that most of the artists went their separate ways to create their own pieces.


Traditionally in Japan, the paper was recycled by splicing the sheets into strips and spun on a hand crank, small, quill wheel. It was then woven into cloth with cotton or silk threads to make kimonos.
The process for spinning the kozo is fairly simple, although rather finicky. Most of the spun kozo is done by dampening the strips and spinning it an average of 7 wheel rotations before winding onto the quill.
I tried that, and it didn't work for me. So then I tried it on my charka, again with no success. Then I attempted to spin it on my Sidekick, it was working better but I had to get a slower whorl. Finally, I had the bright idea to core spin it with silk thread. Boom, I had yarn.


After that I needed to figure out how much material I needed to make a short kimono. I went to my closet and pulled out a few kimonos I had on hand; I went to Pintrest, the library, anywhere I could think of that had resources on making a kimono. I ended up figuring I needed approximately 9 1/2 yards of fabric. This measurement included loom waste. Now, I am not going to go through the whole process of warping the loom because, to be honest, this was the first big project I had ever woven. 

(photo courtesy of Joe) 

But about 3 days of warp measuring and threading the reed and heddles, the loom was ready to start weaving.

I collected all the kozo that I spun and in this whole process I formulated an idea for what this kimono was going to look like. It included many different fibers in neutral colors and a plain weave.


I spun cotton top, lint (right side), ginned cotton (left side); bleached linen tow, water retted linen top, linen strick (bottom); silk noil, silk top. 


All these were combined with the kozo to make something far better than anything I ever could have imagined.

To see the completed piece you will have to wait...
The opening reception is Friday September 8, 2017, at the Western New York Book Arts Center located at 468 Washington St, Buffalo, NY 14203. If you live in the area please stop by and see not only my piece, but all the other artists' pieces. I know I am excited to see what everyone has done with it!

This whole process was made possible by The Western New York Book Arts Center. I extend my deepest appreciation for including me in this wonderful journey.


Llamas, and Camels, and Alpacas, Oh My!

Tuesday, May 23, 2017

Camelids are a special kind of mammal, mainly because they have great fiber! There are only a few species in this family, namely camels, then llamas and alpacas, and finally the more endangered Paco-Vicuna and Guanaco.
Alpaca seams to be the most abundant in the fiber world. It is very warm and very soft. It has a beautiful drape and a good staple length. Huacaya Alpaca is a shorter staple length and is most common, from my experience. The Suri Alpaca is much longer, comparable to a longwool, I have not worked with this variety however.
Bactrian Camels, as opposed to the single hump Dromedary Camel, has a decent amount of usable fiber. Both of these breeds are domesticated. Bactrian Camels have a short, cotton like length staple, but it is very soft and considered a luxury fiber.
Llama is a wonderful fiber to spin and knit. It is highly insulating and has a decent drape to it. I have spun to samples of llama, the first one was beautiful with a great staple length and the second, was clumpy and, what I believe, was second cuts. Take it from me, second cuts are not worth it!
Paco-Vicuna is a luxury fiber, it is rather expensive per ounce, but if you can find some, try it, you won't be sorry. It is very similar to camel, but it has a much longer staple length. It would be great blended with other fibers!
Lastly, the Guanaco, is one fiber that I have not been able to get my hand on, but I understand it is wonderful just like the Paco-Vicuna.
Now let's look at some spinning, shall we?
First to examine is baby alpaca. This light grey fiber was a real dream to spin! I spun 8 ounces total, the one on the left is worsted spun and the one on the left is spun semi-woolen, 2-ply. Note the difference in the two. While the worsted spun is spun fine it still has a lot of drape to it.


With the two next to each other, you can really see the difference.

Next, we'll look at the llama. The first sample was bought from a local heard in New York. It was beautiful fiber, very easy to spin, with really wonderful drape. It was spun from roving. The photo doesn't give it justice in terms of color. The fiber is a red brown color with some white thrown in. This was from one llama, I do remember.


The second sample is the not so nice llama.

Note the halo around the ball. You can also see some of the VM that was in the fiber.


This is the single. The lumps are small clumps of short hair, this is why I say it is seconds. There was none of this in the first batch. This was from a different vendor.

This is the plied yarn. Again you can see the lumps and VM throughout the ball. This is a good example as to why you should always take a good look at the fiber you buy. This wasn't expensive, first warning sign, and I was so drawn to the black llama. Very disappointed.

On my spindle below, I have Paco-Vicuna. What a dream it was to spin. This was just a sample of the fiber. It is super soft, with a very fine micron count, and such a warm color.


 In this, I wanted to show how fine it spun. This is next to a regular pencil. I highly recommend this fiber if you can find it!

Finally, we have camel. This is a very short fiber and difficult to spin on it's own. I have had the most success with it spinning on either my quill, or my charka. The fiber is very loft and is that wonderful camel color.
 
   Again, note the size next to a pencil.
This is a camel and silk blend that I recently got at the Interweave Yarn Fest in Loveland, Colorado. It spun up very well!


I hope you enjoyed this quick introduction on the Camel family. Happy spinning!

The Food Journey

Monday, May 8, 2017

Since moving out here, to Laramie, I've been cooking a lot. I've been making breads and soups, chili, stews, you name it. I only brought a couple of my cook books out here. I brought my two volumes of Julia Child, although Joe can't eat much out of it, but I have been working on making dairy free substitutes. Another book I brought was The Complete Book of Breads. I love this book, there are so many recipes of every imaginable bread.
Today I am making stock. When I had cable I was always watching The Food Network, that is when I wasn't watching The Golden Girls. One of my favorite programs to watch was The Barefoot Contessa. She always said to use homemade stock. I thought it was a lot of work for not much pay off. Well, I was wrong.
My sister recently came to visit. She is not much of a cook, although I think she wishes she was. When I first started cooking, I couldn't make brownies out of a box. Then, my cliche moment, I watched Julie and Julia. This inspired me and I got the cook books. This was when I was in high school when I got the first volume. When I cooked a Julia Child recipe I had confidence, like she was there with me telling me that every step, or misstep, was absolutely perfect. It was great. I think my sister has some apprehensions to cooking, although some of her trials have been perfect and making our grandmother extremely pleased. So, it is with both of them that I am writing this post.
Stock!
I love making stock, it is about as easy as toast. First you'll need a stock pot if you're making a big batch (which I suggest) or something smaller for a smaller batch. You can freeze it and use it as needed. I usually go two months between making it.
Currently, I have a vegetable stock brewing on the stove.
For a lot of recipes, stock is a base, so it is important to make it as quietly tasting, yet still full bodied as possible. To do this you do not want to add some vegetables, beets, broccoli, cauliflower, asparagus, hot peppers, rancid vegetables, etc.
Vegetables that are a must are onions, garlic, celery, carrots, mushroom stalks. With these vegetables, I use the parts I don't use in cooking regular dishes, like the skins, the bulb and root parts, the tops, etc. When I'm fixing a meal with any of these things I put the discards in a produce bag and put it in the freezer until I make the stock. The hunks are very roughly chopped, skins and all. The liquid will be strained in the end.
Here is a hint that comes from my fiber experiences, if you use darker skinned onions in your stock you'll get a darker color stock.
So you put all these hunks of vegetables in the stock pot and you cover them with water. Turn your burner on high and get it to a boil. While it's heating up you add the spices and herbs. Salt and pepper are the first things. Make sure to add a good amount of salt, it will help draw out the flavors of the vegetables. Then you add your herbs. Bay leaves are very important in getting a full bodied tasting stock. Then, as Simon and Garfunkle say, "parsley, sage, rosemary, and thyme". Go sparingly on the sage and rosemary as these are potent herbs. If you tend to make more Mediterranean dishes, add oregano.
Once your stock is boiling, turn it down to a simmer and let it simmer for a few hours. Taste it, making sure to not burn your mouth, and check for seasonings. Ask yourself, is it missing something? Does it need more salt? But, remember, this should be a mildly tasting stock. When it's good and ready, you can fish out some of the bigger pieces with a strainer.
Then, being careful if it's still hot, get your freezing containers and a mesh strainer. Place the strainer over the container and spoon the stock over it, this is going to save you from all the impurities from getting in your dish. once you fill the container about 3/4 of it's capacity let it cool, and then put the lid on and put it in the freezer.
Voila, you have stock.
Now, you can make meat stocks and fish stock. I have not made fish stock, as it can get stinky, and I'm a little scared of the fish heads. But beef and chicken stocks are easy as well. Use all the same ingredients in these as your vegetable stock. In beef stock add bones and trimmings. If you want to be fancy, cook the bones on a sheet tray in the oven for about 40 minutes or until they get a little golden brown coloring. Shin bones are good, you can usually buy packages at your butcher's that say stock bones, or just ask them for help. You can also use scraps from whatever beef dishes you're making.
For chicken or turkey stock the process is nearly the same. If you cook a whole chicken, or buy a cooked chicken from your grocery store, save the carcass, all the bones, and whatever meat you don't eat. Put all this in the pot with your vegetables and cover with water. Add the herbs and let boil for a few hours.
In the meat stocks you will have to skim the top of the stock during the cooking process. You'll get some grey-ish colored foam on the top. Just skoop it off with a spoon. You will also have fat in it. This can give an unpleasant texture in your mouth. Let the stock cool off and then put in the refrigerator. The next day take it out, and skim the congealed fat off the top. Now freeze.
Stock is really quite simple and it is really worth the time to make it. Just save your scraps and add water and herbs. I have faith you can make a delicious stock!

Examining the Old to Make the New

Wednesday, March 8, 2017

You may not know that when I was a senior in college I received an undergraduate research fellowship through Buffalo State College. It was through this fellowship that I got a taste of curatorial work with the Historical Society of the Tonawandas. For a summer I was the curator of the clothing and textile collection of this organization. At the time the collection was not cataloged and some of the boxes had not been looked into for 20 or more years. Each day I went into work was another amazing opportunity to see old clothes and textiles. To me, the entire collection felt like my children; I brought them into the light, putting them on dress forms I breathed life into them, taking their picture for documentation was like watching their first step and posting it on social media for everyone to see, knowing full well that I was one of the very few who appreciated it for the true beauty it was.
I learned so much from that summer, and from all the work I did with the historical society. We mounted a modest exhibition of clothes from the collection at the local library and in order to do so we needed dress forms, so, I made them using information from Janet Arnold. I find all of her work to be most valuable; even if you're not a fashion historian it is very fascinating to see her illustrations of historical clothing from England. The book that I went to numerous times that summer was A Handbook of Costume, one of her lesser known books. It has since become a rather expensive out-of-print book, but if you can get your hands on a copy at your local library, I greatly encourage it.
In this book Janet Arnold explains how you can learn from clothing. She talks about having the actual garment in front of you but also how to examine art works, of all forms from paintings to stain glass windows, to better understand the clothes in them.
So, why am I telling you all of this? To me, clothing is a vital part of seeing who people were in past times. It can also teach us how to do better work with our fiber crafts. Since moving to Wyoming I feel as though I've fallen into being a vintage clothing dealer. I can look at clothing or textiles and tell you how they were made. That is something that I am proud of, and today will be the first of many posts in an examination of a certain garment. This post will be on the simple side, a late Victorian to early Edwardian full apron.

Description:
This is the apron with a dress underneath. The front is on the left and the back is on the right. It is made from a simple white cotton calico with a small floral sprig motif printed on it in navy blue. It is simply constructed with all straight of grain pieces. There are two patch pockets on either side at hip level. There is one button at the top of the yoke at center back.


How they made it:
The fabric was a mere 25 inches wide. One panel 43 inches long is the front. A second, the same length is the back, but split down the middle. There is a small gore at the side seam, placed on the selvage, measuring 13.25 inches with a height of 3.5". The bias side of the triangle is placed on back panel and the straight of grain is on the side seam.
The yoke and straps are a folded 4 inch piece of straight of grain material cut into 12 inch pieces. The little ruffled hem flounce is 75 inches long and 4 inches wide, so three 4 inch wide strips of the 25 inch wide fabric.
With the front panel, you would gather it down to 12 inches and sew the yoke to it. The back yoke is cut in half and the back panels are sewn into each yoke piece. The straps are top stitched on the yokes. The sides seams are open from the yoke down 11 inches. The fabric folded twice and top stitched. The rest of the side seam is felt felled. The hem flounce is sewn together, hemmed on one long side and gathered on the other. It is then mounted on the apron hem using a french seam. A 7/8 inch button hole is made, on the horizontal, 1 inch in from the center back. A matching button is sewn on the other side to form the closure. The patch pockets are a 6 inch square with a slightly rounded bottom. They are placed 4.5 inches down from the bottom of the armseye, with one side placed on the front panel side of the side seam.
Does that make any sense? If not, comment, and I will try and clarify!
Now you're probably say, 'Ben, this is an old apron and this would not fit me, nor can I find 25 inch wide fabric!' So, here's some thoughts on modernizing it:
You can shorten it, although fiber friends I think it would be helpful to have a full length apron to card or dye or spin in.
Substitute fabric. If you get a 54 inch, or so, wide fabric you can make the full length apron in 2 yards of fabric, less if you want it shorter. The only important thing here is to not pick a directional fabric or one that you will have to match a pattern on, then you're going to need more fabric. Or, if you wanted to use scraps of fabric you could piece them together into the shapes and have a sort of crazy quilt apron. The straps and yoke could be substituted for ribbons.
Make it fit you. I would make the front and back yokes 2 inches shorter than your across front measurement. This measurement it taken from one side of where your arm meets your chest to the other, pretty much right over your heart. For the front and back panels, I would measure your hips and add 6 inches for ease, more if you want it to be more full. Half of your hip measurement plus ease should be the width of your front panel.
Again, does this make sense? Contact me if it doesn't! I'd be more than happy to explain it more!
I hope this inspires you to examine the old to make your next new project! Be prepared for more in depth examinations too!

In Depth Look at the Fleece Study Part 8

Friday, February 17, 2017

Today marks the fifth in a series of posts in which we are going to look at an in depth explanation of all the breeds in the fleece study. Generally I spun rather thin, but I tried to spin how ever the wool felt comfortable.
Today we are looking at some other fleece samples that do not fit in any of the previous families.


Left to right: Jacob, Columbia, Bleu de Maine, Corriedale


The Jacob sample that I had was a fairly even distribution between brown and white. I split the colors up from brown, to mixed, to white. I then carded the locks into variegated colors and spun them from white, to mixed, to brown. I then took the single and Navajo plied it to keep the color way consistent.


The Columbia sample was carded and spun woolen. The end result is something on the crisp side, but with a nice loft and slight halo.


I was pleasantly surprised with the Bleu de Maine sample. I was able to spin it quite fine from roll logs and still keep a very soft feel. This would be another sample I would spin again.


The last sample to be looked at is Corriedale. I unfortunately spun both the single and the ply in the same directions and it came out a little wonky. However, the sample was easy to card and spin. The resulting yarn, though over plied has a fairly soft hand to it.

Thus concludes the In Depth Look at the Fleece Study. I hope this opened your eyes to many different breeds of sheep and I hope you try some of them. This study was an amazing thing to do as a spinner. It was highly educational and opened many avenues for me to examine the whole process from fiber preparation, to spinning, to setting twist. The next journey in the spinning world for me is going to be a study through the Camelids. Stay tuned!